Tutorial Details
- Program: Adobe Photoshop CS3+
- Difficulty: Beginner
- Estimated Completion Time: 1 – 2 Hours
Download Source Files
- Source files for this tutorial are available to Premium members.
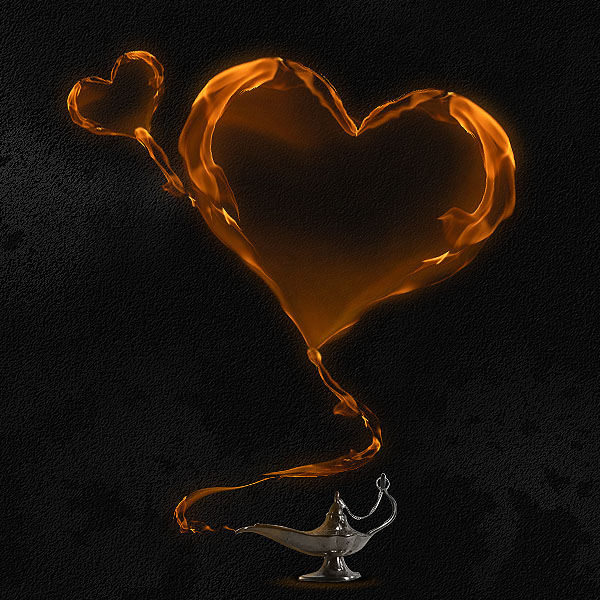
Final Product What You’ll Be Creating

The Warp feature in Photoshop can be a powerful tool if you know how to use it correctly. In today’s tutorial we will demonstrate how to combine a few stock images to create a magical flaming heart illustration. Let’s get started!
Resources Used
Step 1
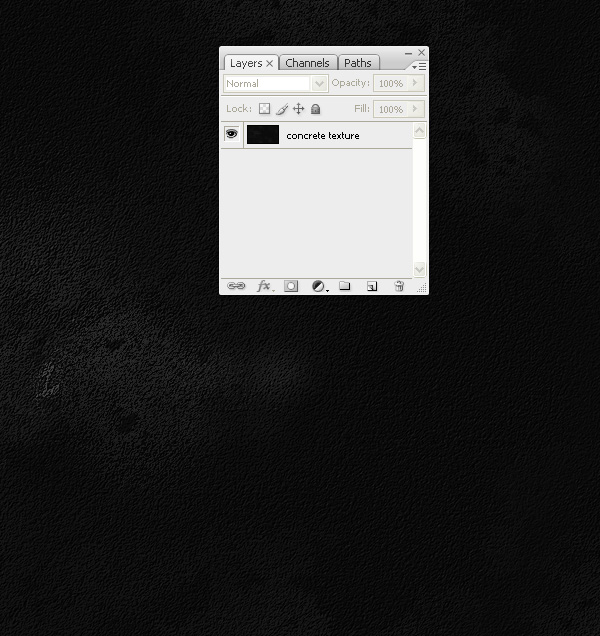
Create a new document 1920 x 1080. Download the Concrete Texture that we created in our Create Metallic Texture Tutorial some weeks back.
Step 2
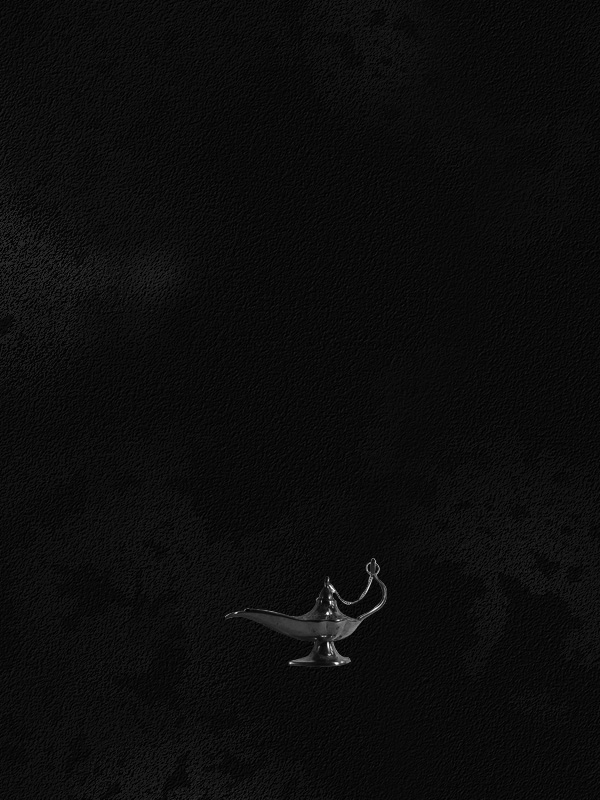
Download Aladdin’s Lamp and place at shown below. Desaturate it using Cmd + Shift + U.
Step 3
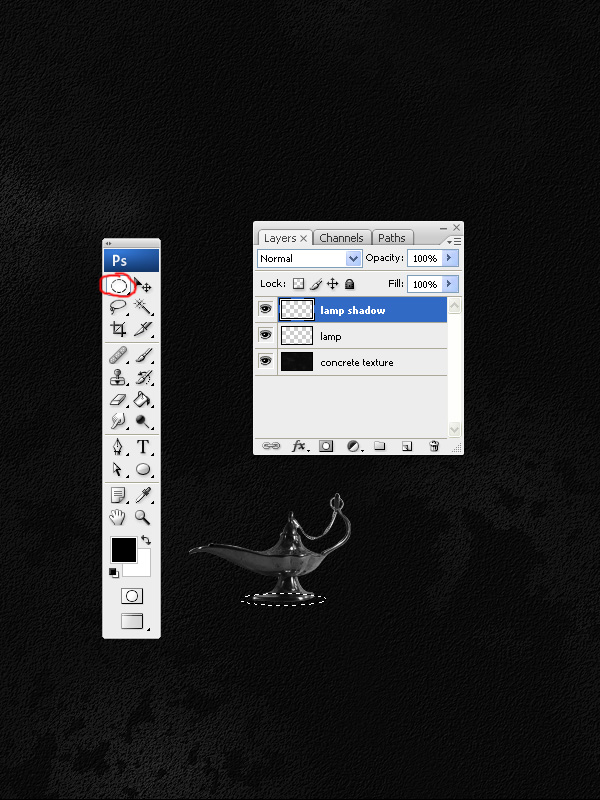
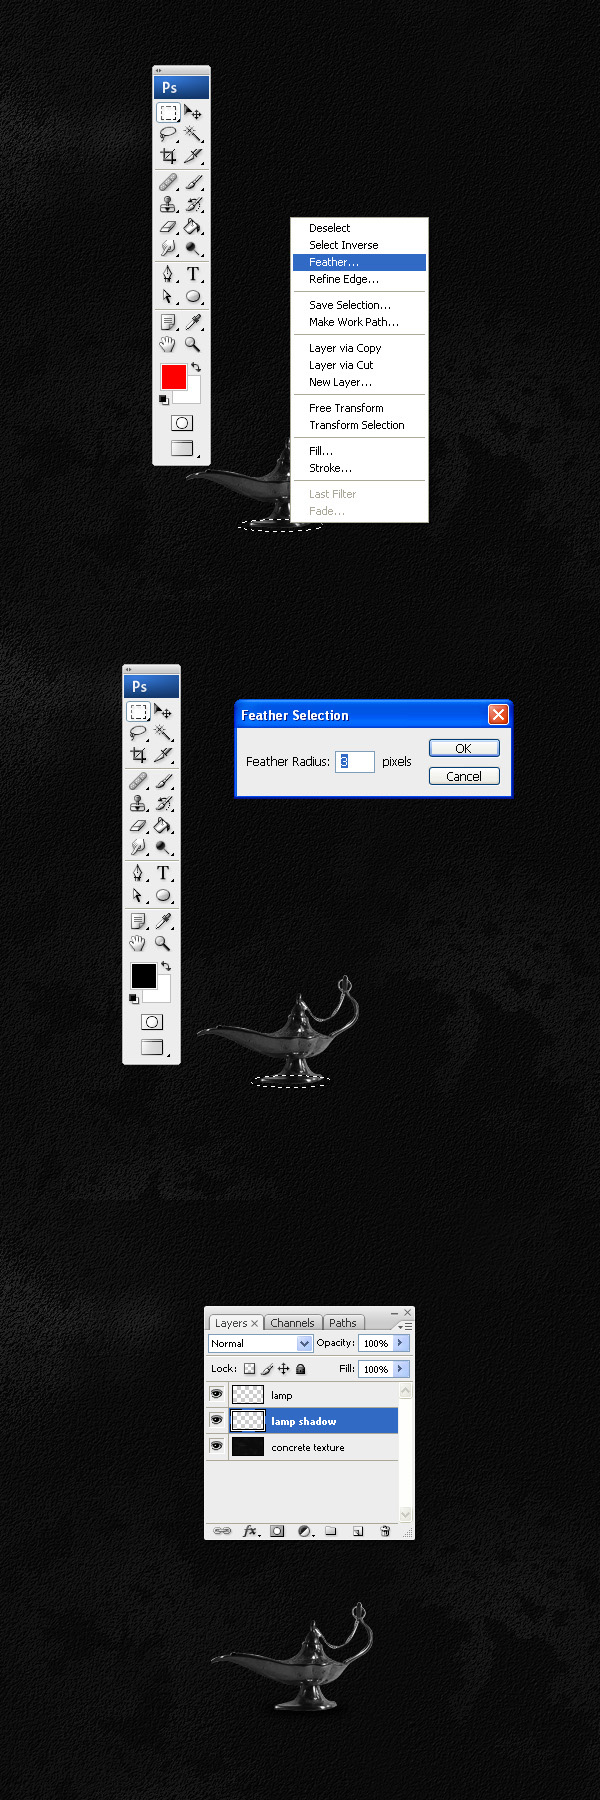
Add a shadow for the lamp. Create a new layer and name it “Lamp Shadow.” Using the “Ellipse Marquee Tool” create a selection as shown below.
Step 4
Right click into selection and select “add feather” with value of “3px” and fill with black.
Step 5
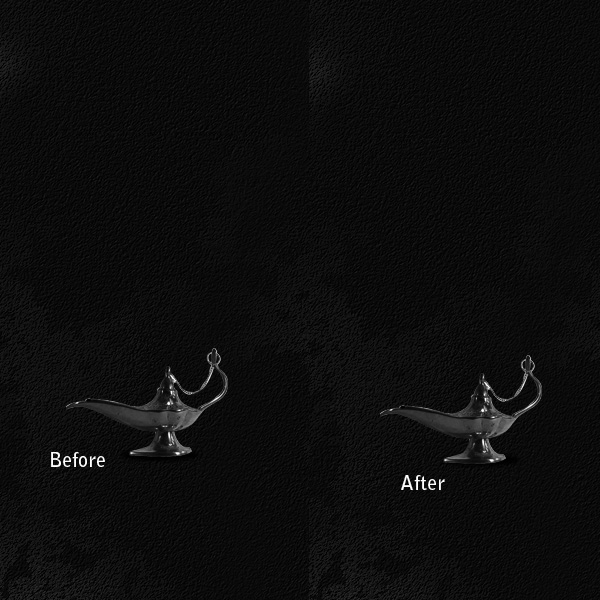
Move the “lamp shadow” a little bit up and to the right as shown below.
Step 6
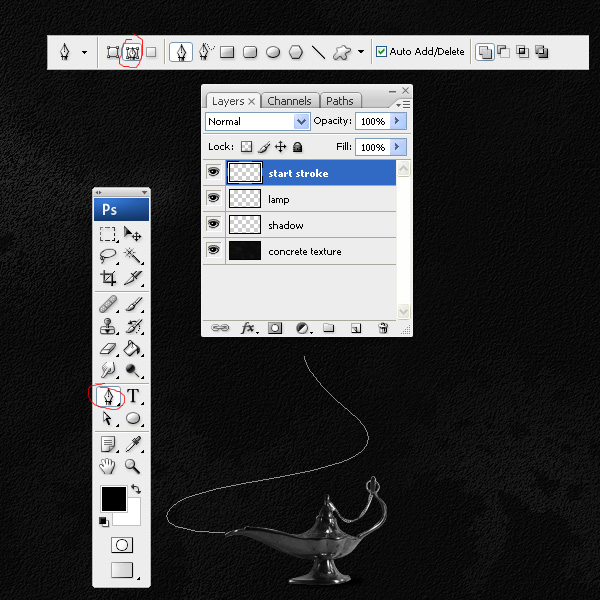
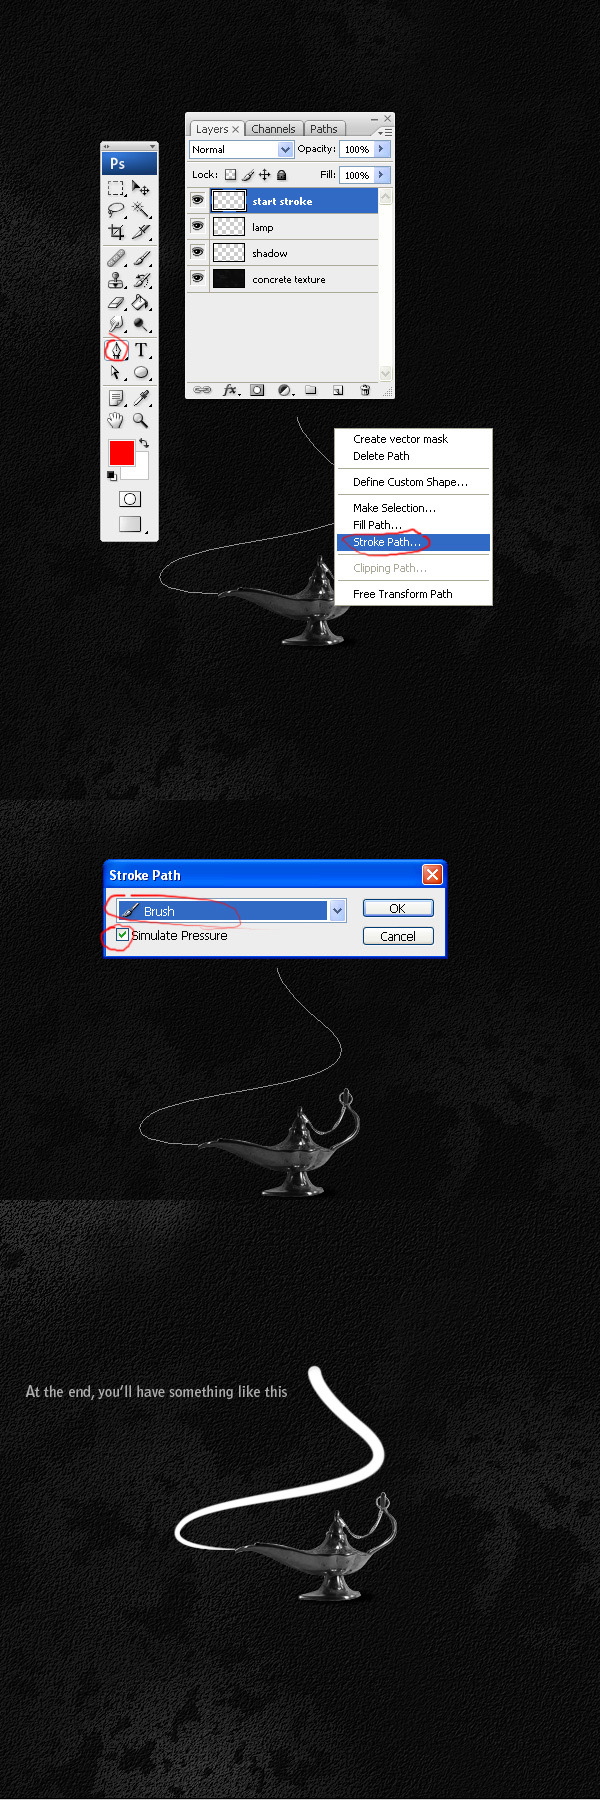
Now before we start adding fire to the lamp, we need references to help things along. Create a new layer on top of all layers and name it “start stroke” and then using “Pen Tool” create a path as shown.
Step 7
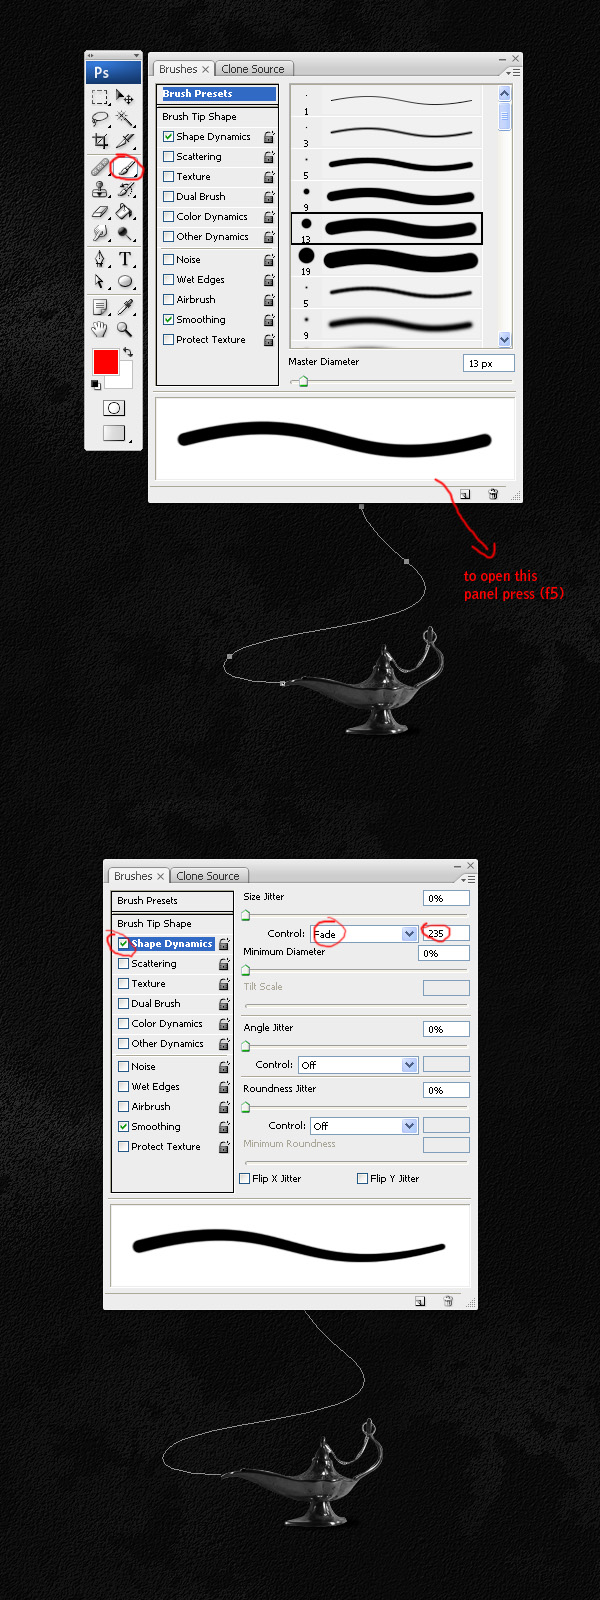
Open the Brush Palette and prepare a brush to use to stroke our path.
Step 8
Select the “start stroke” layer, grab the pen tool, right click and choose the Stroke path option.
Step 9
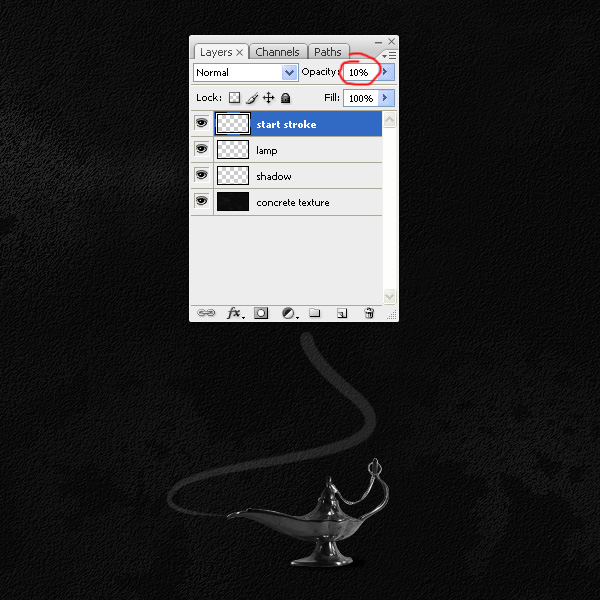
Lower the opacity of the “start stroke” layer to 10% or 20%.
Step 10
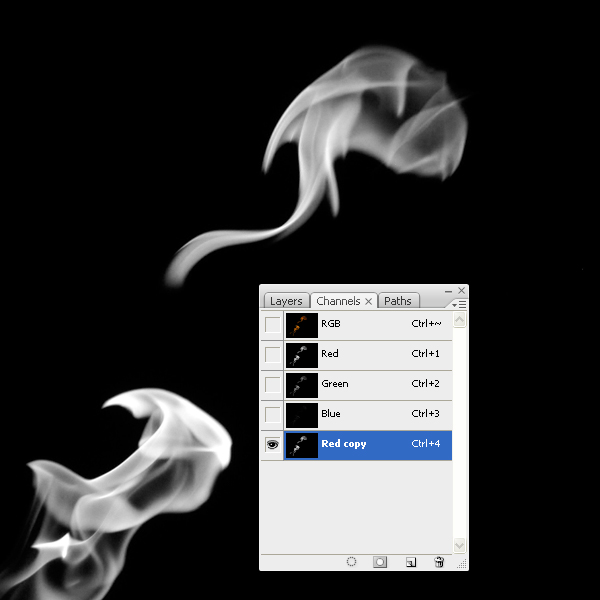
Download the Fire image and open it Photoshop. Open Channels and duplicate the Red Channel.
Step 11
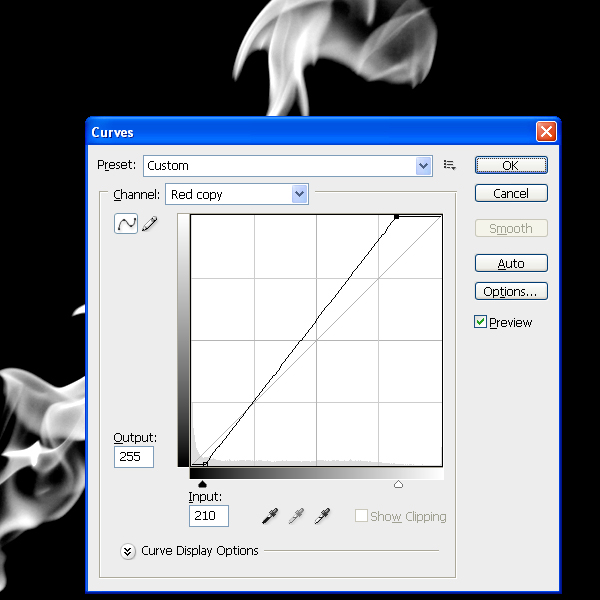
Go to Image > Adjustment > Curves and apply the settings below.
Step 12
Now press Cmd and click on this Channel to load a selection or go to Select > Load Selection and press okay.
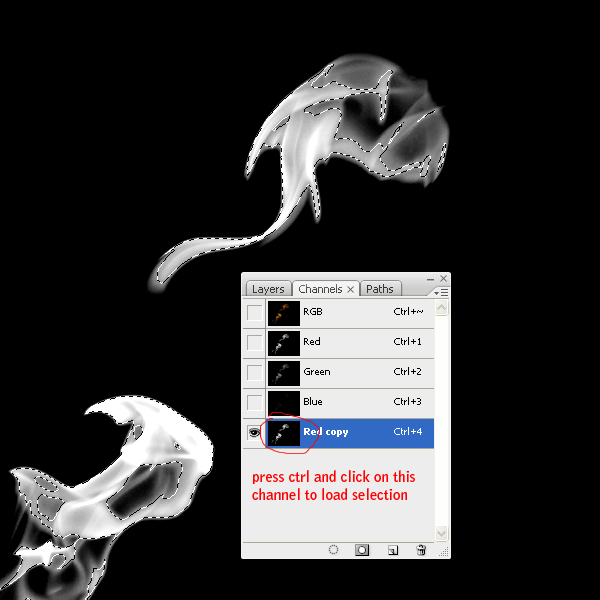
Step 13
Now come back to the layer panel and simply copy it and past it into your working document. Name this layer “fire flame”.
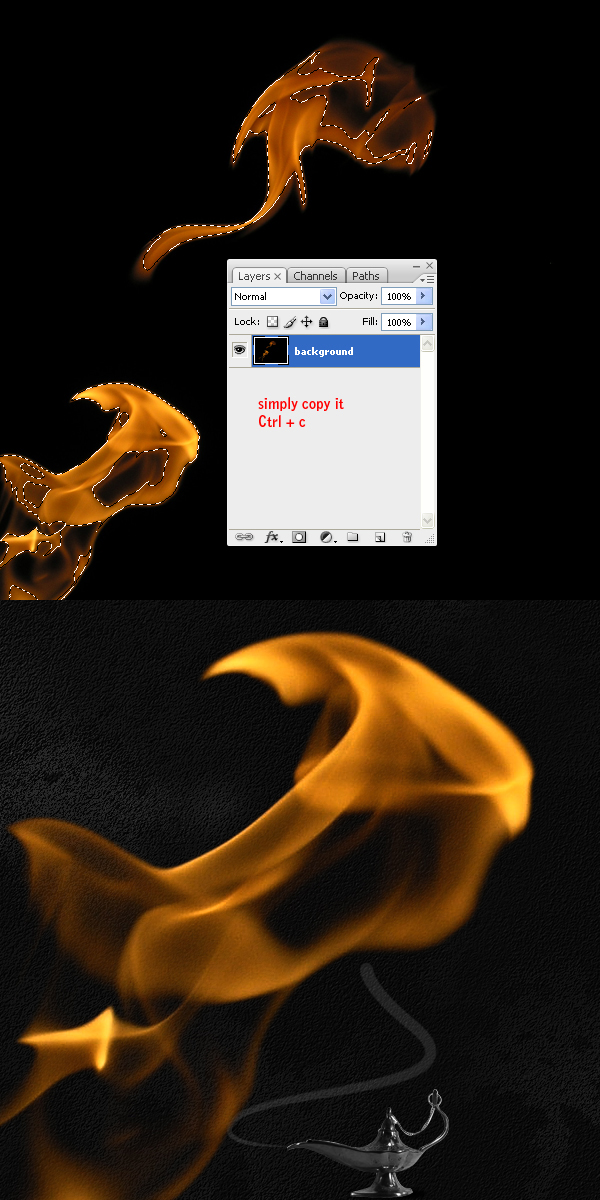
Step 14
Press Cmd + T to scale it down.
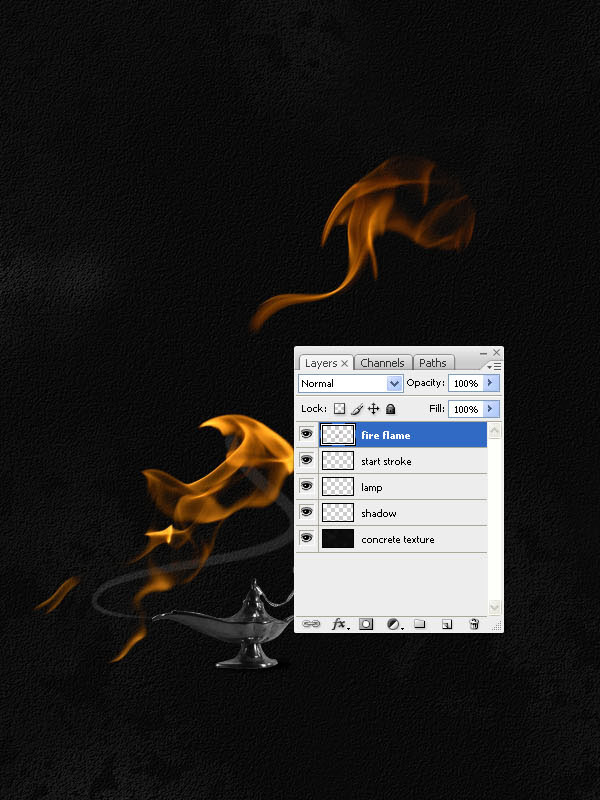
Step 15
Using the lasso tool, create a selection around bottom flame and then press Cmd + Shift + J. This will separate both flames.
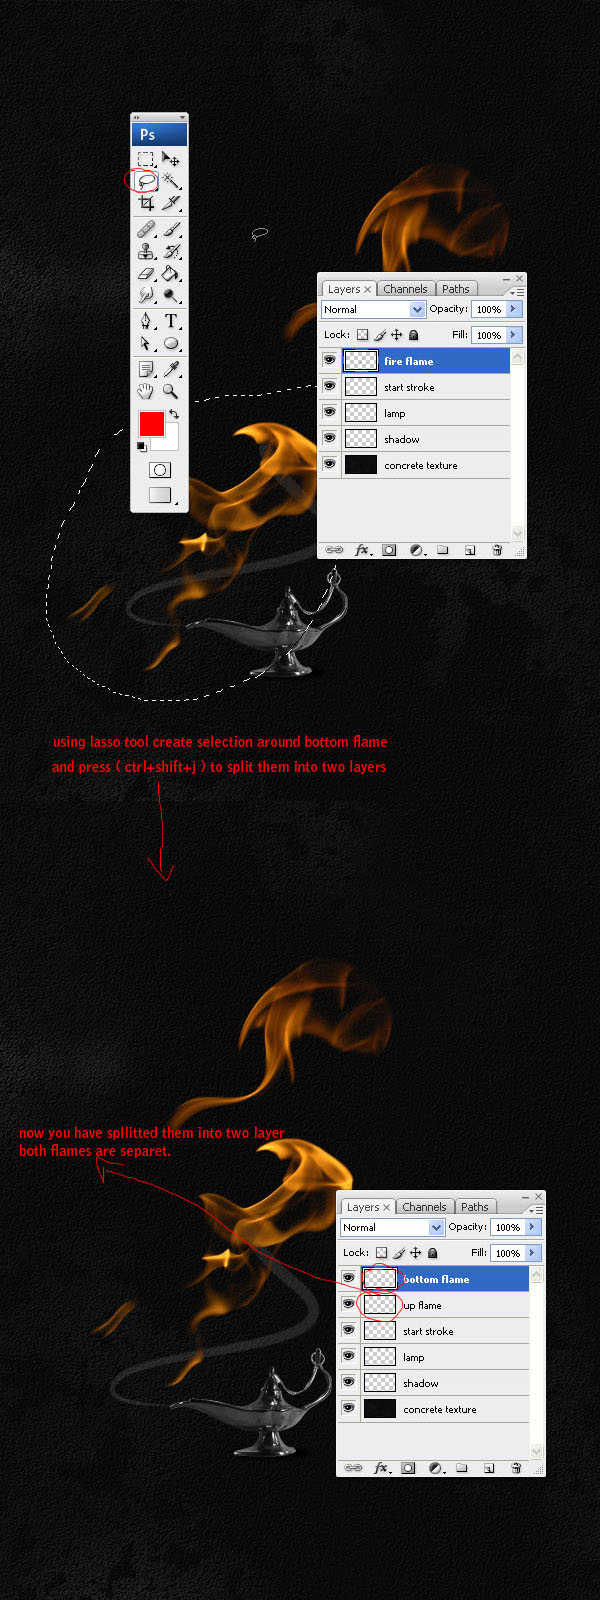
Step 16
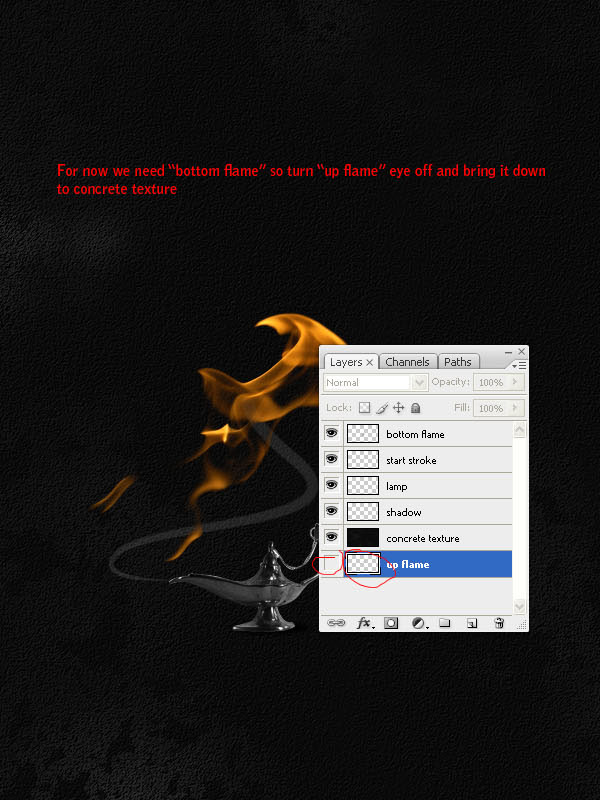
For now we need only the bottom flame so hide the top flame for now.
Step 17
Duplicate the bottom flame layer as a backup and then press Cmd + T to scale it down a little. Press Cmd + T, right click and choose warp.

Step 18
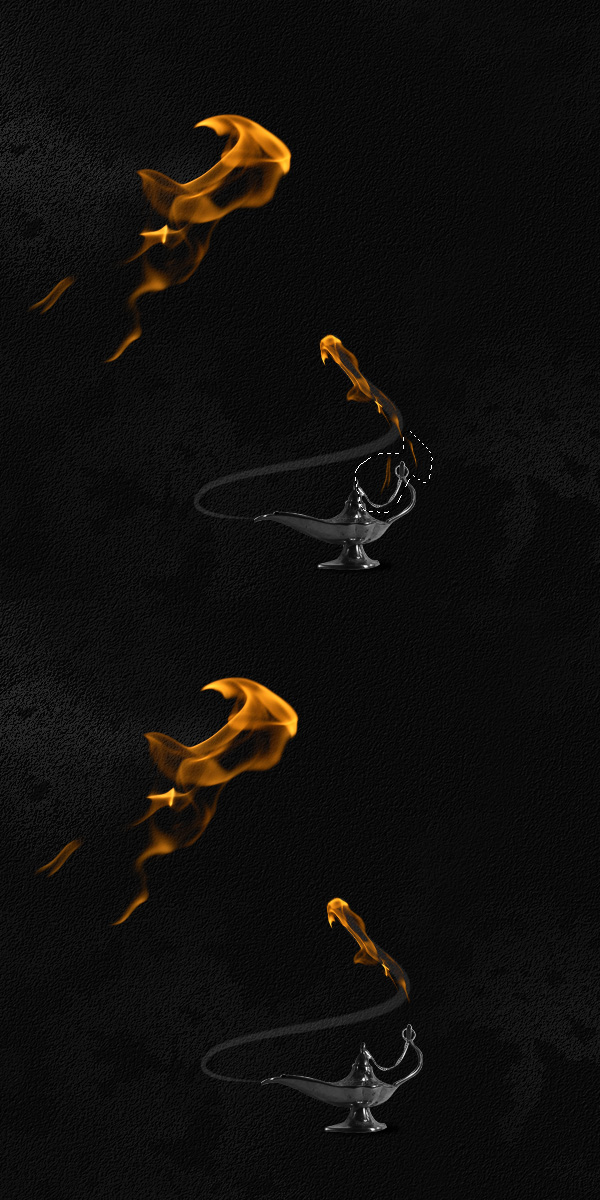
Now let’s delete some unneeded areas. Using the lasso or pen tool make a selection as shown below. In the coming steps you will have a lot of flames so be sure to name the flames properly so you can recognize them later on.
Step 19
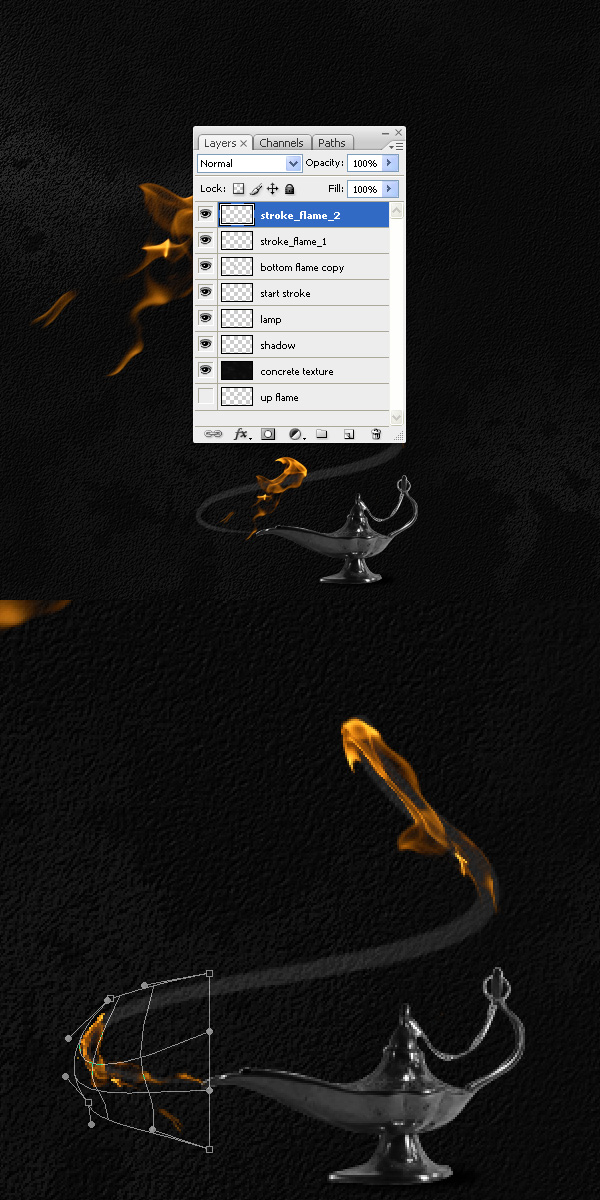
Duplicate the big flame layer and name it “stroke_flame_2” scale it down and warp it as before.
Step 20
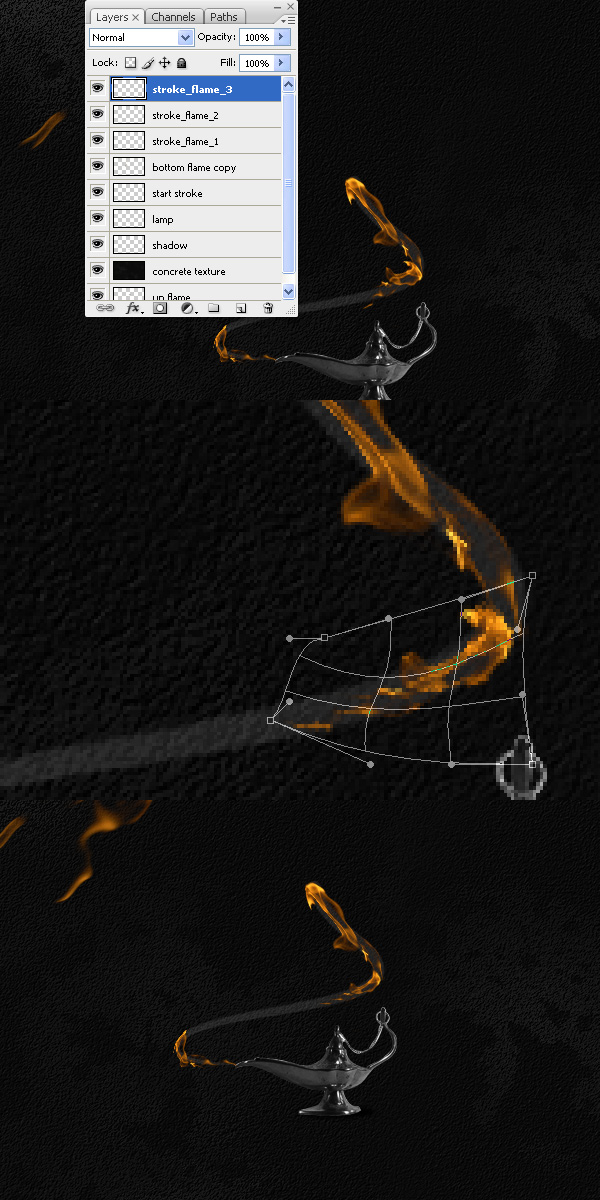
Again, Duplicate the big flame layer and name it “stroke_flame_3.”
Step 21
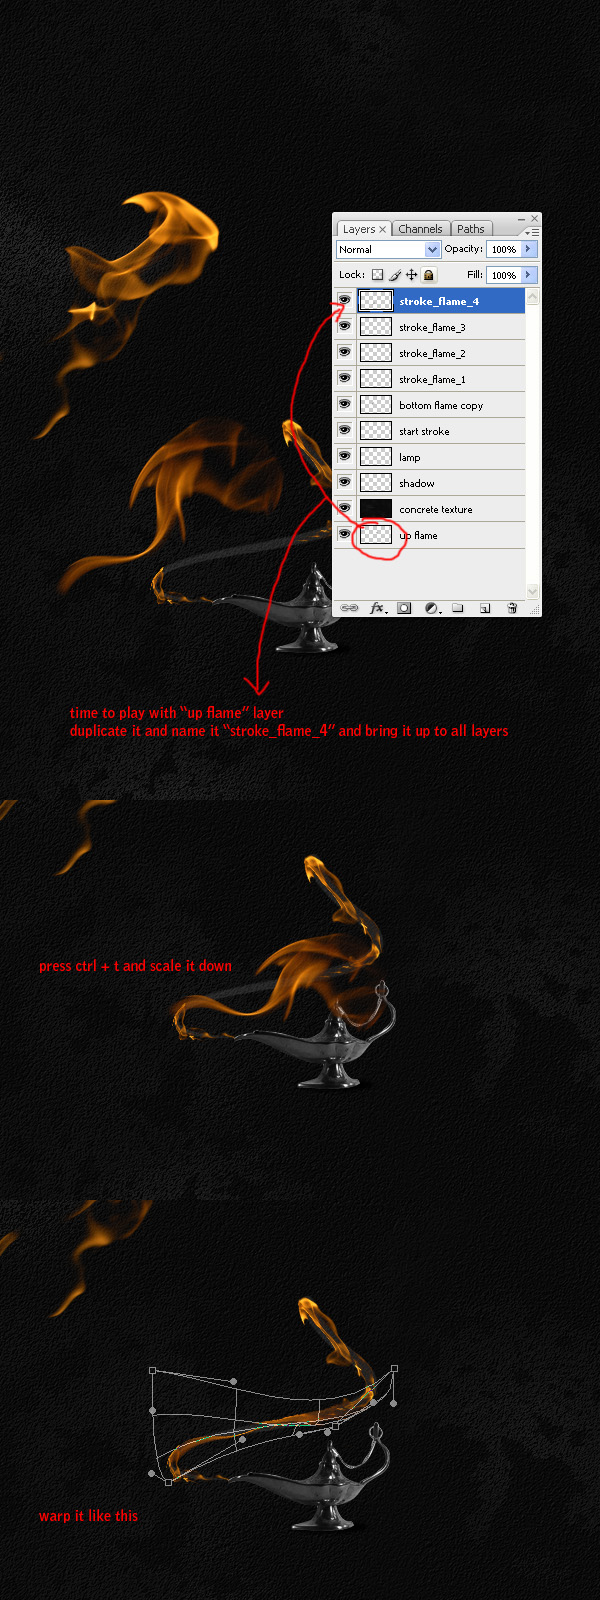
Now, let’s reveal the top flame that we hid earlier. Duplicate it and name it “stroke_flame_4.” Bring it above all other layers, scale it down a little bit and warp it as shown.
Step 22
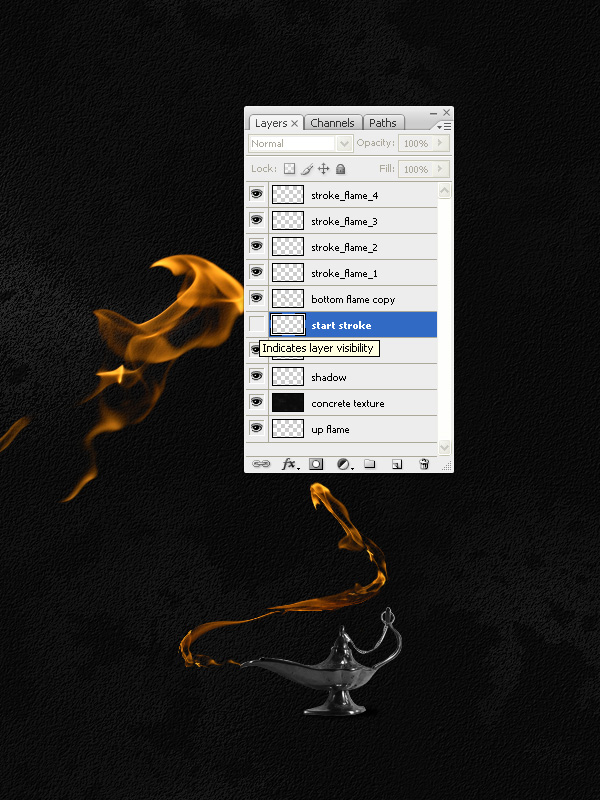
Now that we have successfully created first part of the flame we don’t need the reference stroke that we created earlier. Delete it.
Step 23
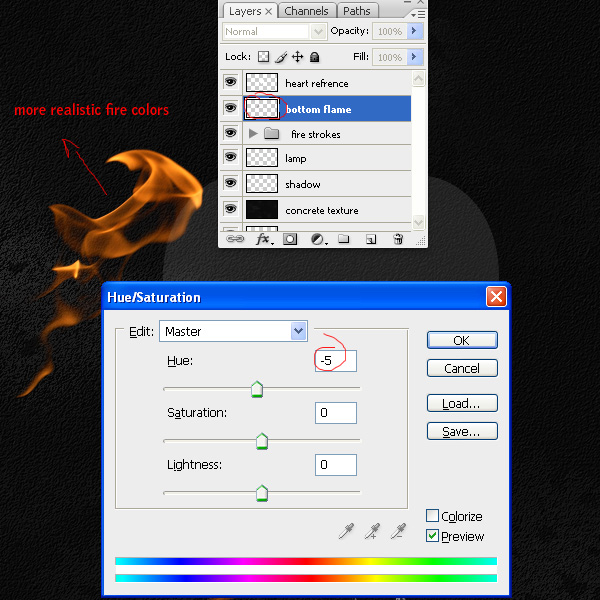
You may have noticed that the middle flame is colored differently than the others. Go ahead and edit it’s saturation as shown below to make look more realistic. To do this go to Image > Adjustment > Hue/Saturation.

Step 24
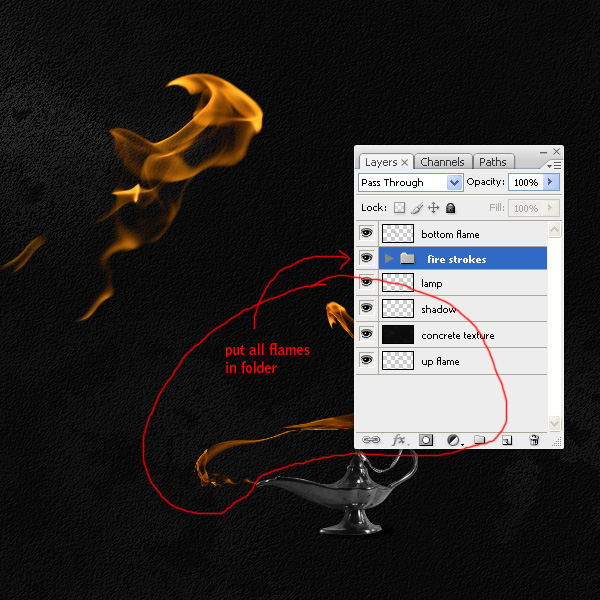
Before we start work on the heart all flames and place them into a folder.
Step 25
Now we are going to start work on the heart. Before we begin, we need to create a reference heart like we did for the flame strokes. You can find a nice heart example in Photoshops’s default custom shapes folder. Create a new layer, name it “heart reference”. Pick the heart shape from Photoshop’s custom shapes. Draw it and fill it with white color. Lower its opacity to 10%.

Step 26
We will use the same technique for the heart as we did for the lamp. Before you begin the process, make sure that you edit the saturation so we don’t run into the same problems as we did in Step 23.
Step 27
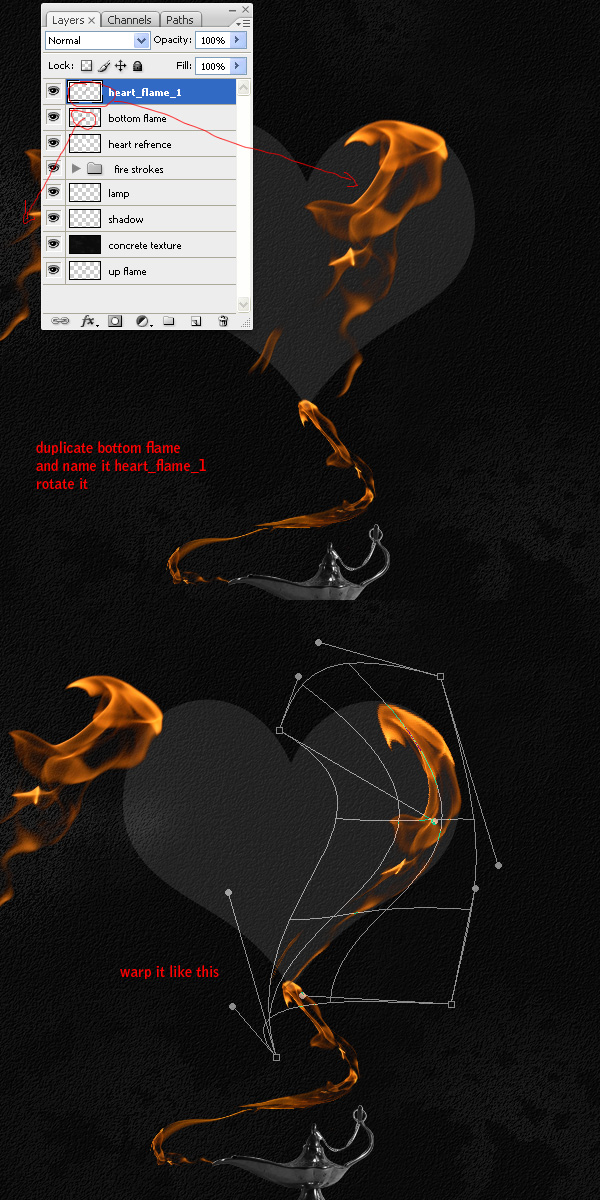
Duplicate the bottom flame and name it “heart_flame_1” and bring it above all other layers. Warp as shown.
Step 28
Remove unneeded elements and then go to Filter > Liquify and warp flame as shown.

Step 29
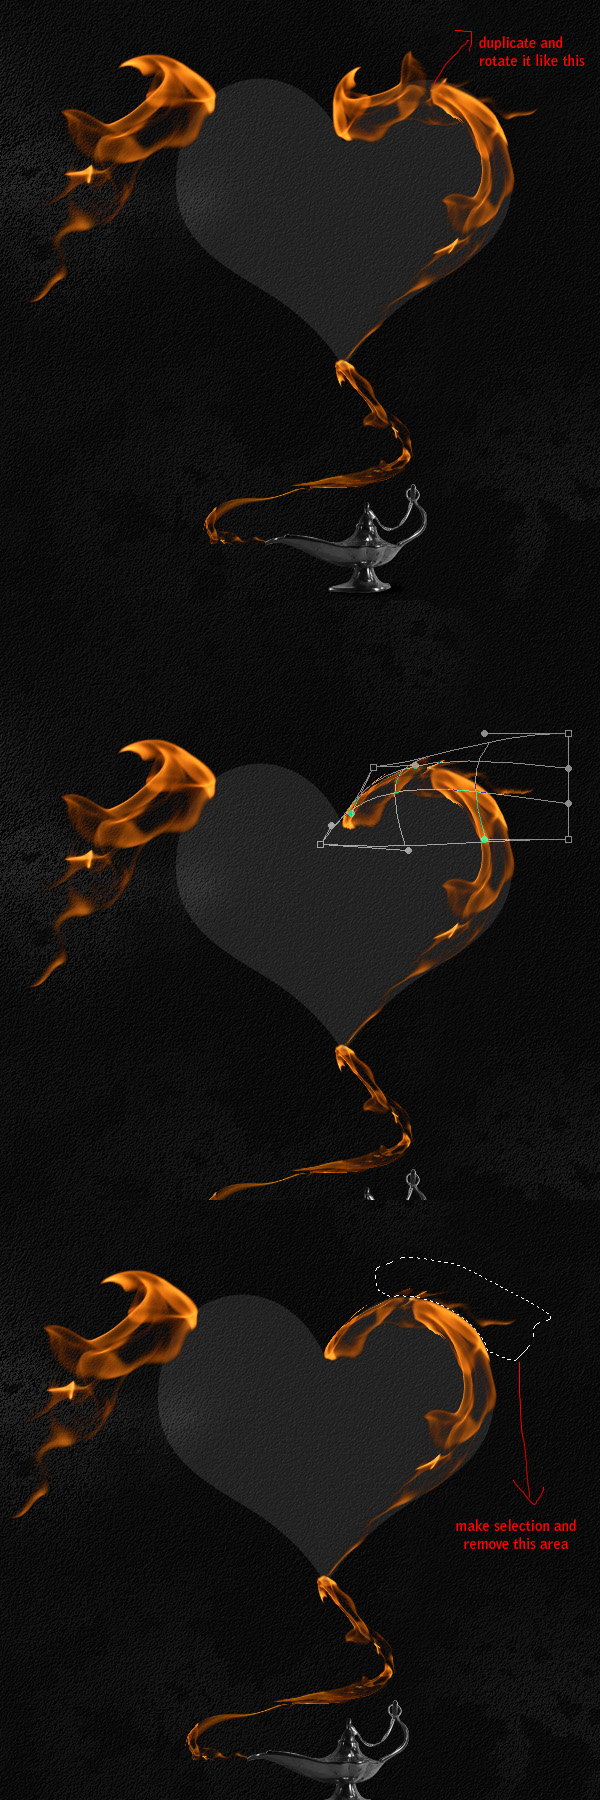
Duplicate the big flame, name it “heart_flame_2” and rotate it, warp it and remove unneeded elements.
Step 30
Select both “heart_flame_1” and “heart_flame_2” duplicate them by dragging them to the new layer icon at the bottom of layer panel. Transform new duplicated as shown. Select all Heart flames and merge them together.

Step 31
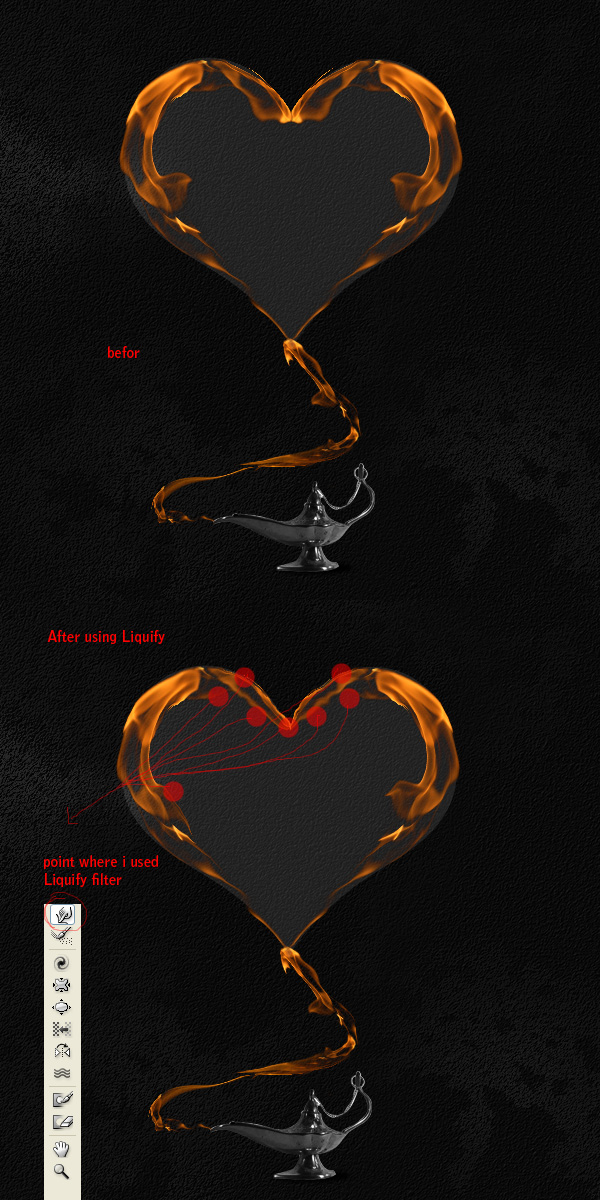
Go to Filter > Liquify , and use the warp tool to create some variations.
Step 32
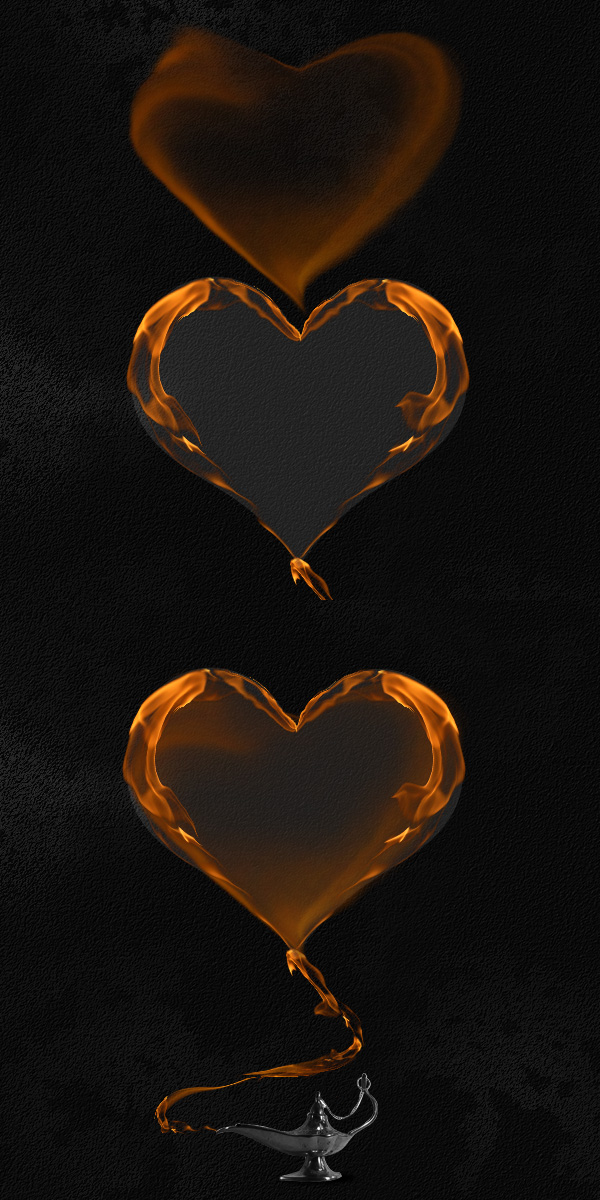
Now let’s work on the inside of the hear. I already made an image that you can use here. Download it here and paste it into your working document as shown.
Step 33
Now you can delete the hear reference layer.
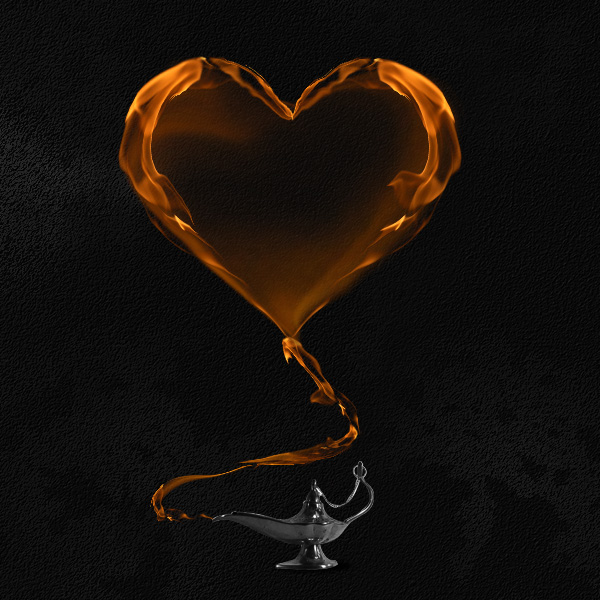
Step 34
Select the “inside heart” layer and go to Filter > Liquify. Warp the edges as shown.
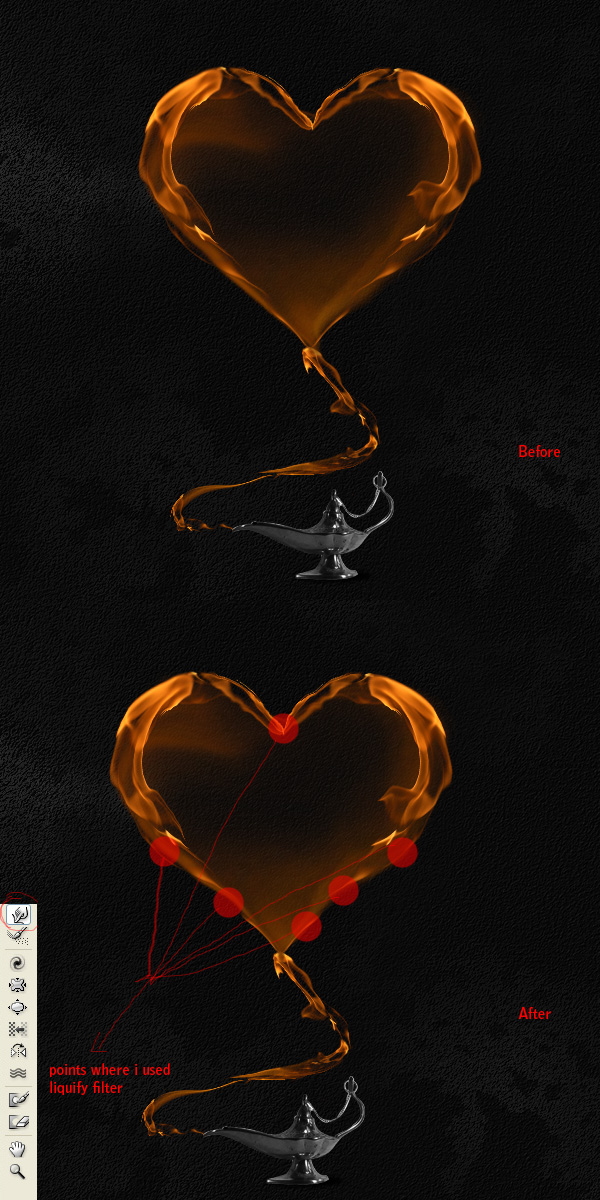
Step 35
The heart is almost done. Select “heart flame” and “inside heart” layer and rotate them as shown.
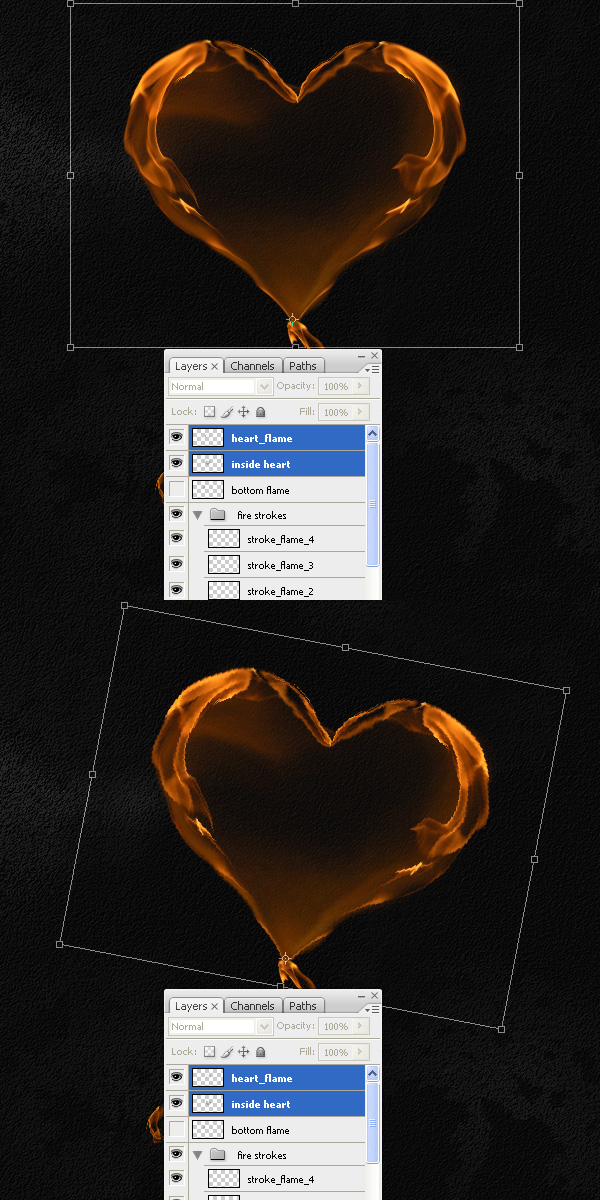
Step 36
Merge “heart_flame” and “inside heart” and name the new layer “big heart”. Duplicate it and name it “mini heart.” Scale it down using the transform tool (Cmd + T) and place it as shown.
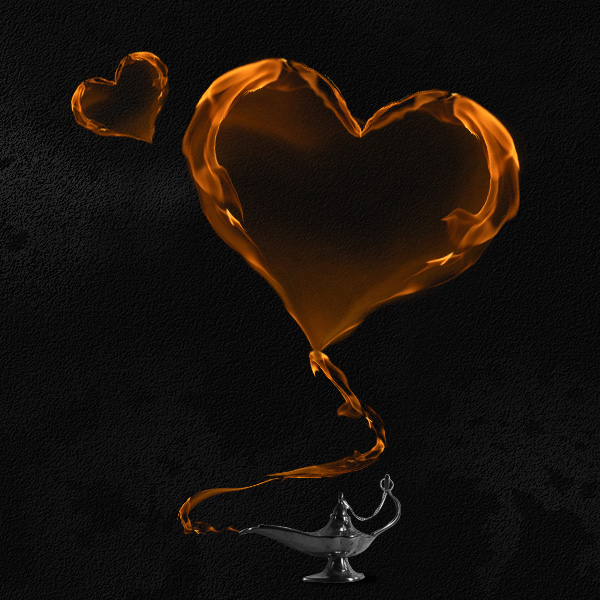
Step 37
Duplicate “stroke_flame_1” layer and bring it above all other layers to create a trail.
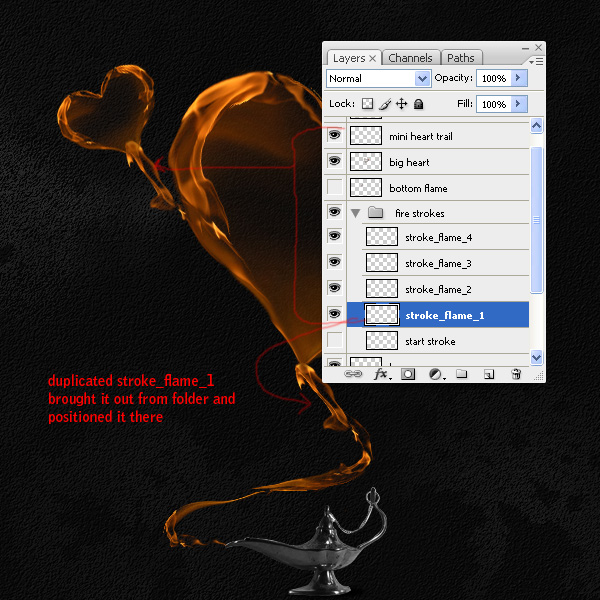
Step 38
You may have noticed that both the trails look a bit unrealistic. To fix this, open the Liquify filter and fix them as shown.

Step 39
Select the big heart’s trail layer which is “stroke_flame_1” and repeat Step 38.
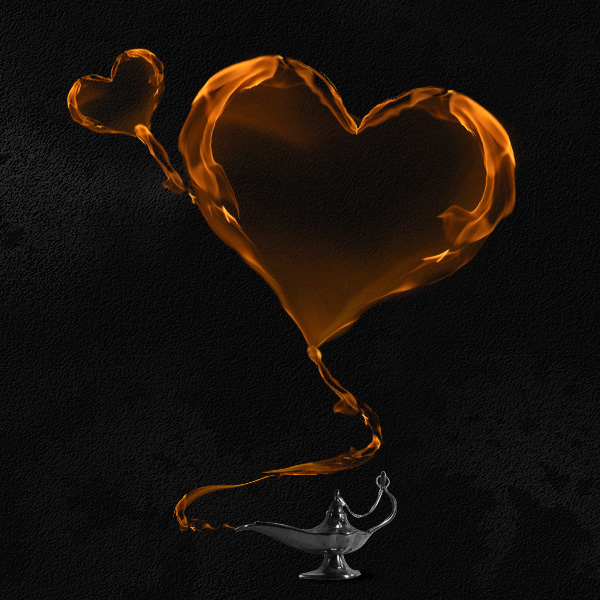
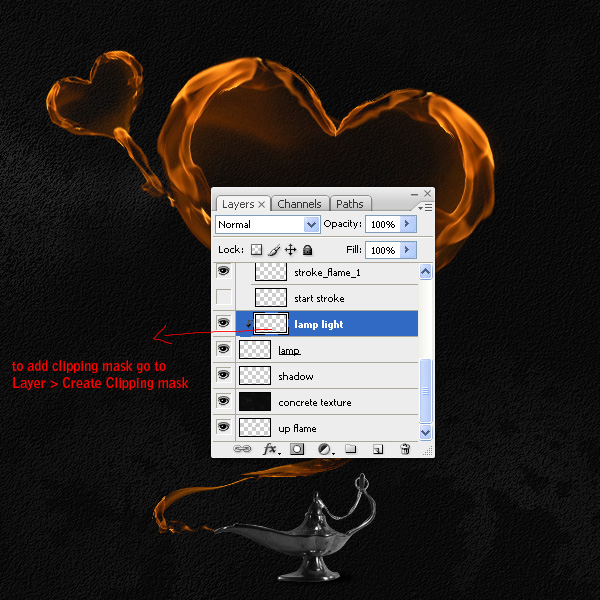
Step 40
Okay we are done with warping/distortion, now it’s time to paint. Create a new layer above the lamp layer, name it “lamp light” and go to Layer > Create Clipping Mask.
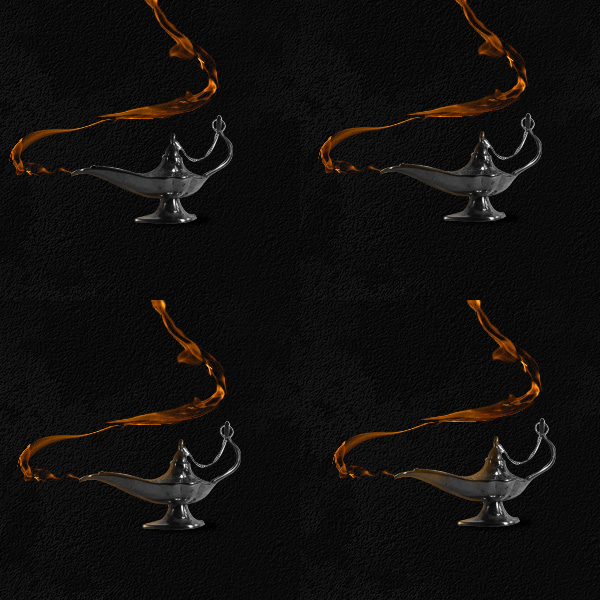
Step 41
Apply the following brush settings: Size: 3px, Roundness: 0px, Opacity: 40px, Flow: 30%, Color: ff8a00.
Step 42
Start painting on lamp’s edges as shown.
Step 43
Change the brush settings as follows Size: 100px, Opactiy: 20%, Flow: 10%.
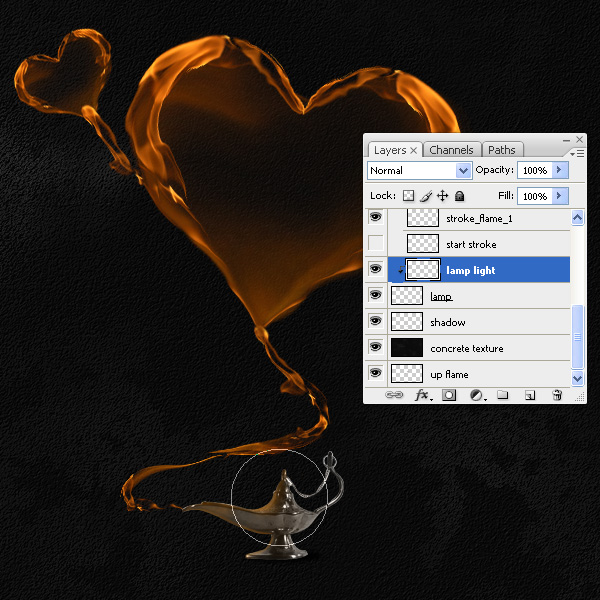
Step 44
Create a layer below lamp. Call it “lamp glow”. Select transparent gradient tool, color: ff8a00.
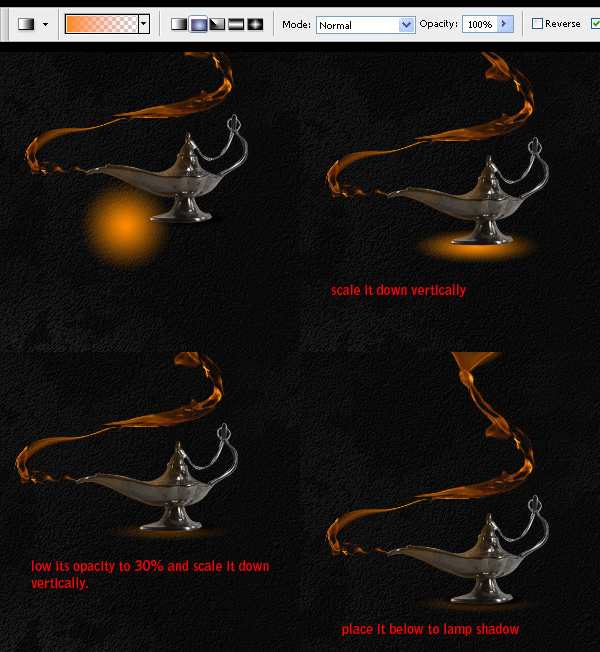
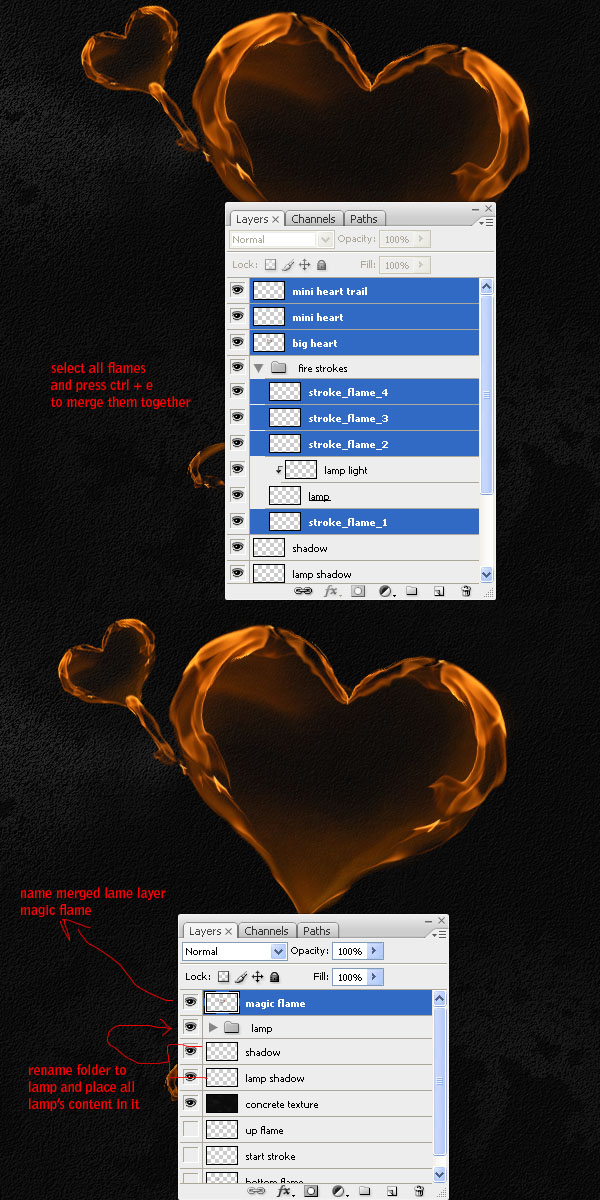
Step 45
Add a little glow behind the flames, this will make it look more realistic. So Merge all the flames together and name them “magic flame” but before merging them backup your document. You may need to edit flames individually in future.
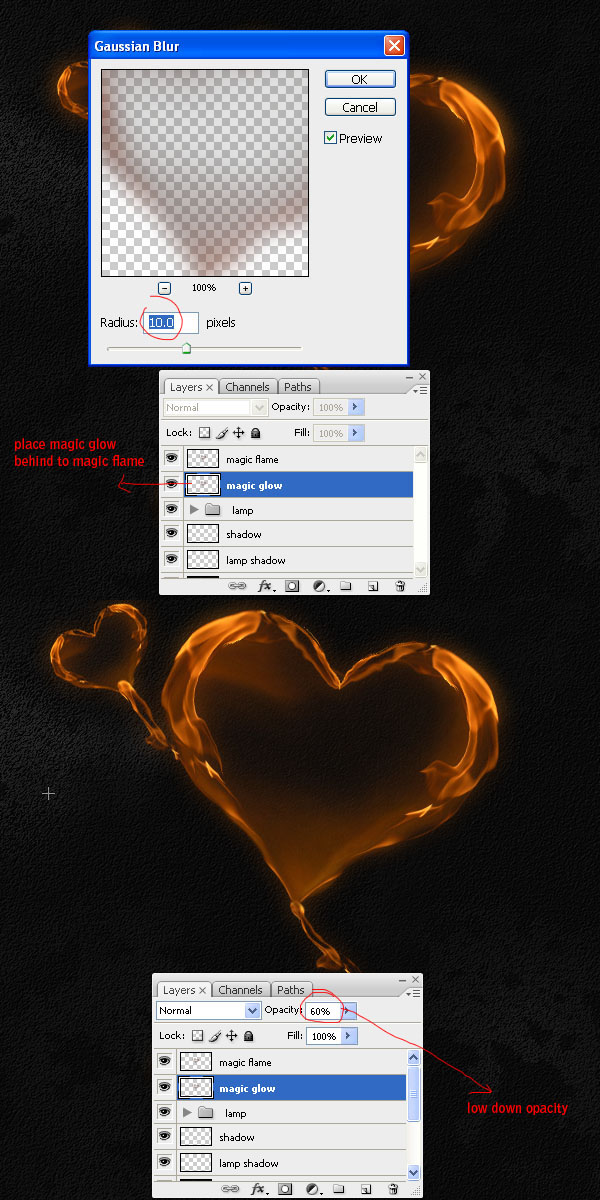
Step 46
Duplicate “magic flame” and name it “magic glow”. With “magic glow” selected, Go to filter Blur > Gussian Blur > 10px. Lower its opacity to 60%.
Step 47
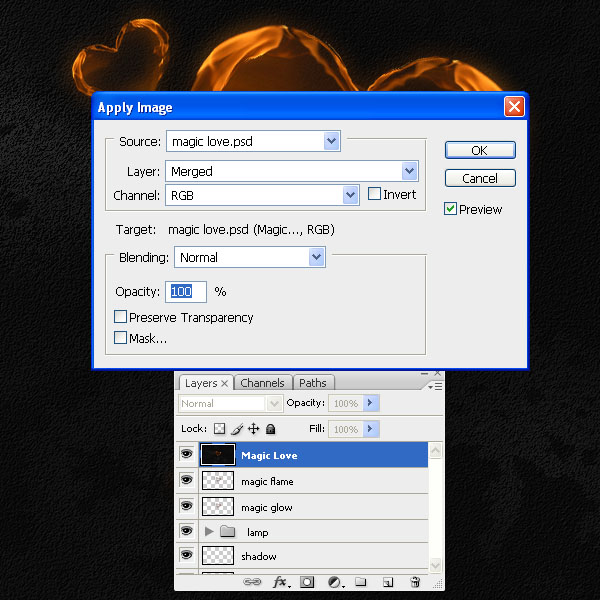
Create a new layer above all other layers and name it “Magic Love.” Go to Image > Apply Image.
Conclusion
Once you have everything in one layer, Go to Filter > Shapern > Shapern. You are done!
